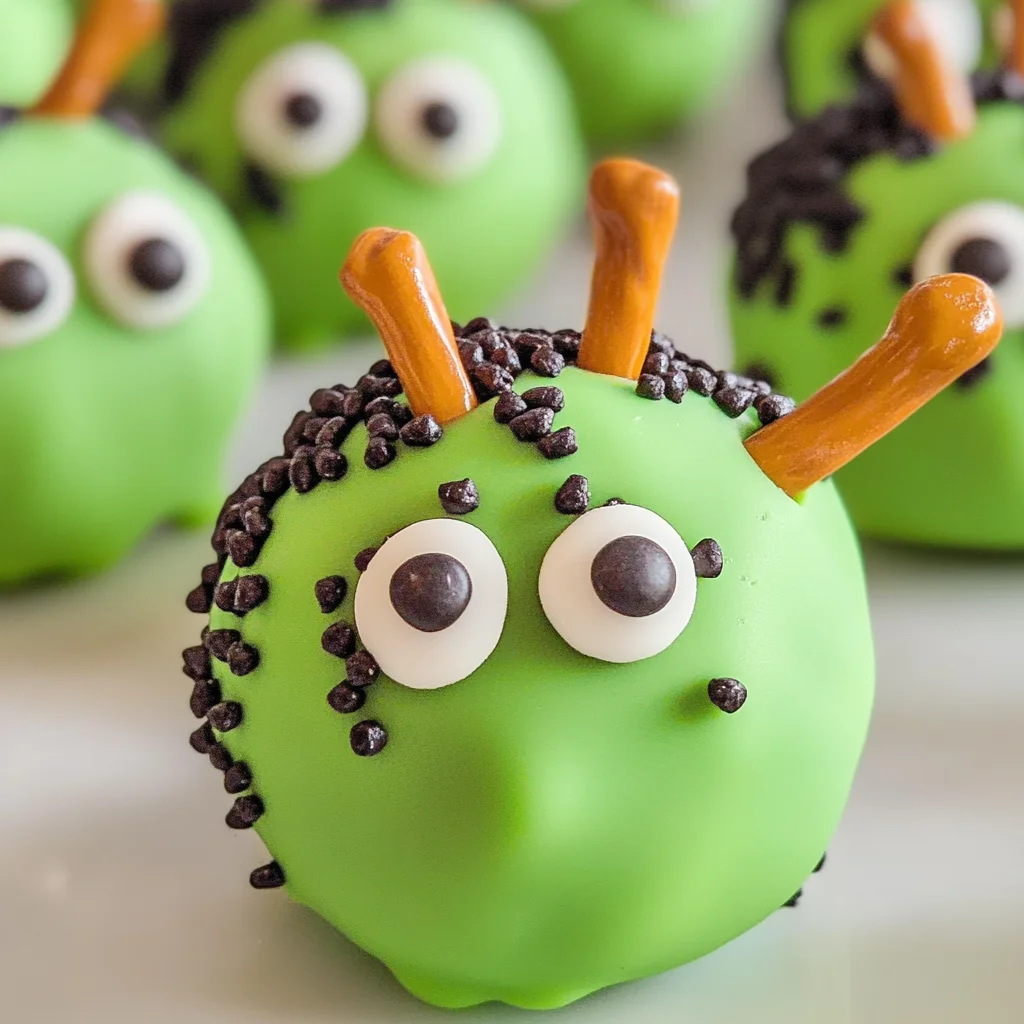
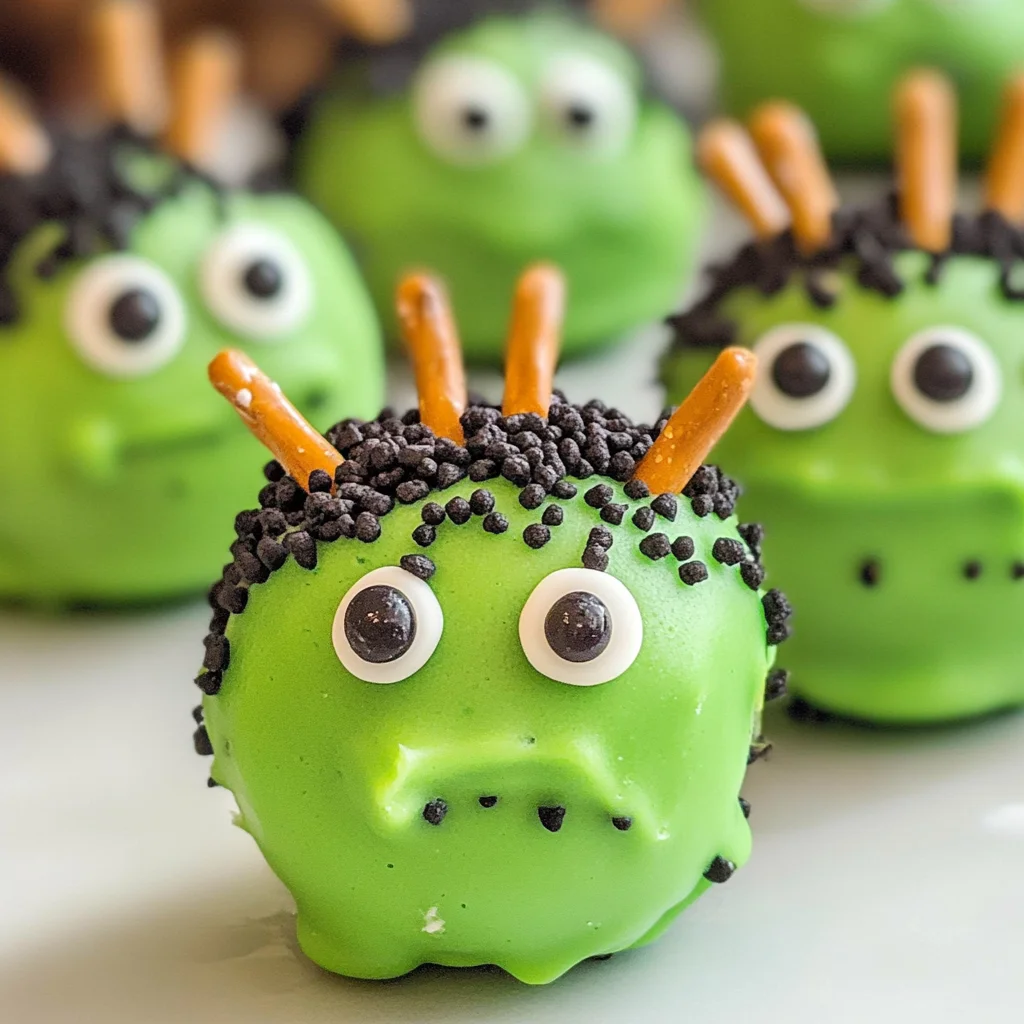
Frankenstein Oreo Balls
Frankenstein Oreo Balls are a fun and festive treat perfect for Halloween parties, school events, or just for a spooky snack at home. These no-bake treats combine the classic flavors of Oreo cookies with cream cheese and are coated in vibrant green candy melts to resemble everyone’s favorite monster. The addition of candy eyes and pretzel sticks makes them even more delightful. This recipe is not only easy to follow but also a crowd-pleaser that brings smiles to all ages.
Why You’ll Love This Recipe
- Easy to Make: No baking is required, making them a quick and hassle-free dessert option.
- Fun and Creative: Get creative with decorations! Each ball can be unique, making it a great project for kids.
- Perfect for Any Occasion: While they shine during Halloween, these treats can be made year-round for any celebration.
- Decadent Flavor: The combination of chocolatey Oreos and creamy filling creates a rich, indulgent bite.
- Eye-Catching Presentation: Their vibrant colors and whimsical design make them visually appealing on any dessert table.
Tools and Preparation
Before diving into this delicious recipe, gather your tools and equipment. Having everything ready will streamline the process.
Essential Tools and Equipment
- Mixing bowls
- Electric hand mixer or stand mixer
- Cookie sheet
- Parchment paper
- Microwave-safe bowl
- Forks or dipping tools
- Ziploc bag (sandwich-size)
- Scissors
Importance of Each Tool
- Mixing bowls: Essential for combining ingredients smoothly without creating a mess.
- Electric hand mixer: Saves time and effort when mixing the cream cheese with Oreos for a consistent texture.
- Parchment paper: Prevents sticking, making it easy to transfer your finished Frankenstein Oreo Balls without damage.
Ingredients
To create these delightful Frankenstein Oreo Balls, you will need the following ingredients:
For the Oreo Mixture
- 36 Oreos (finely crushed)
- 8 oz cream cheese (softened at room temperature)
- 1 teaspoon vanilla extract
For Coating and Decoration
- 2 cups light green melting wafers
- ½ cup black or dark chocolate melting wafers
- 1-½ tablespoons crisco shortening
- Black sprinkles (long not round)
- Pretzel sticks
- Small candy eyes
How to Make Frankenstein Oreo Balls
Step 1: Combine Ingredients
In a large mixing bowl, combine the crushed Oreos, cream cheese, and vanilla extract. Mix using an electric hand mixer or stand mixer for 1-2 minutes until fully combined into a dough-like mixture.
Step 2: Shape the Balls
Using a 2 tablespoon cookie scoop, take dough from the bowl and roll it into even, smooth balls using your hands. Place each ball on a large cookie sheet lined with parchment paper. Press down gently to flatten the top. Flip each ball over on its side and repeat until you achieve a square shape.
Step 3: Chill the Balls
Place the cookie sheet in the refrigerator to chill for about 2 hours. This helps firm up the mixture before coating.
Step 4: Prepare Green Coating
As the chilling time nears its end, prepare the green melting wafers. Place them in a microwave-safe bowl. Heat on 50% power or defrost mode for 1 minute. Stir with a fork and add 1 tablespoon of crisco. Return to the microwave in additional 30-second bursts, stirring in between until melted and smooth.
Step 5: Coat with Green Chocolate
Dip each shaped Oreo ball into the green chocolate using two forks or dipping tools, ensuring it’s completely coated before placing it back on the cookie sheet. Scrape off excess chocolate as needed.
Step 6: Add Decorations
Immediately dip one side of each square into black sprinkles to create Frankenstein’s hair. Position candy eyes on the front face of each bite. Break pretzel sticks into approximately 1-inch lengths and press them into both sides of Frankenstein’s head for added character.
Step 7: Pipe Chocolate Details
For added decoration, melt remaining dark chocolate or black melting wafers with crisco as before. Transfer to a small Ziploc bag, seal tightly by removing excess air, then cut a tiny hole in one corner for piping.
Step 8: Create Faces
Remove your chilled cookie sheet from the refrigerator. Use your piping bag to add smiles or frowns onto each bite—get creative with shapes!
Step 9: Final Chill Before Serving
Let your Frankenstein Oreo Balls chill again for another 30 minutes before serving them up at your next gathering! Enjoy these spooky treats that are sure to impress everyone!
How to Serve Frankenstein Oreo Balls
Frankenstein Oreo Balls are the perfect treat for Halloween parties or spooky gatherings. Their fun appearance and delicious taste make them a hit with both kids and adults. Here are some creative ways to serve these delightful monster treats.
On a Dessert Platter
- Arrange the Oreo balls on a colorful dessert platter for an eye-catching display. Add some Halloween-themed decorations like mini pumpkins or spider webs to enhance the festive look.
With Halloween Themed Drinks
- Pair your Frankenstein Oreo Balls with festive drinks like green apple punch or spooky smoothies. The vibrant colors will create a cohesive theme at your party.
As Party Favors
- Package individual Oreo balls in clear treat bags tied with orange or black ribbons. This makes for a sweet party favor that guests can take home.
Alongside Other Halloween Treats
- Serve your Frankenstein Oreo Balls alongside other Halloween-themed desserts, such as ghost cupcakes or pumpkin cookies, to create a fun dessert table that caters to all tastes.
How to Perfect Frankenstein Oreo Balls
To make sure your Frankenstein Oreo Balls stand out, follow these helpful tips for perfection.
- Use fresh ingredients: Ensure that your cream cheese and Oreos are fresh for the best flavor and texture.
- Chill thoroughly: Allow the formed balls to chill properly before dipping them in chocolate. This helps them keep their shape.
- Work quickly with melting wafers: Chocolate can harden fast; work efficiently when dipping and decorating your balls.
- Customize decorations: Get creative! Use different colored melting wafers or sprinkles to give each ball a unique personality.
- Practice piping: Before decorating, practice piping designs on parchment paper to improve your technique.
Best Side Dishes for Frankenstein Oreo Balls
Frankenstein Oreo Balls can be complemented beautifully by a variety of side dishes. Here’s a list of sides that pair perfectly with these spooky treats.
- Pumpkin Soup: A warm, creamy pumpkin soup can balance the sweetness of the Oreo balls while adding seasonal flavor.
- Cheese Platter: Offer an assortment of cheeses with crackers and fruits for a savory contrast to the sweet treats.
- Veggie Tray: Fresh vegetables served with a dip provide a healthy option that guests will appreciate alongside the rich dessert.
- Spooky Popcorn Mix: Create a Halloween popcorn mix using popcorn, candy corn, and chocolate drizzles for an easy, festive snack.
- Fruit Skewers: Colorful fruit skewers add brightness to your table and offer refreshing bites between sweets.
- Mini Sandwiches: Prepare bite-sized sandwiches filled with turkey or chicken salad for guests looking for something savory amidst the sweets.
- Chocolate-Covered Pretzels: Sweet and salty chocolate-covered pretzels make another fun treat that pairs well with the flavors of the Oreo balls.
- Halloween-Themed Cheese Ball: Shape a cheese ball into a pumpkin or other festive design for an enjoyable savory addition to your spread.
Common Mistakes to Avoid
Avoiding common mistakes can help you create the perfect Frankenstein Oreo Balls. Here are some pitfalls to watch out for:
- Not chilling the mixture – Skipping the refrigeration step can lead to messy, unshaped balls. Always chill your mixture for at least two hours to firm it up.
- Overheating the chocolate – Heating chocolate too quickly can cause it to seize. Use 50% power in the microwave and heat in short bursts, stirring frequently.
- Insufficient coating – Failing to coat the Oreo balls fully may result in uneven textures. Make sure each ball is entirely covered in green melting wafers before decorating.
- Ignoring the decoration details – Neglecting the finishing touches like sprinkles or eyes can make your treats look less appealing. Take time to decorate each ball for a fun presentation.
- Using the wrong size scoop – Using a scoop that is too large or small can affect consistency and presentation. Stick to a 2-tablespoon cookie scoop for uniformity.
Storage & Reheating Instructions
Refrigerator Storage
- Store leftover Frankenstein Oreo Balls in an airtight container.
- They will last up to 5 days in the refrigerator.
Freezing Frankenstein Oreo Balls
- You can freeze these treats for up to 3 months.
- Place them in a single layer on a baking sheet before transferring them to an airtight container or freezer bag.
Reheating Frankenstein Oreo Balls
- Oven – Preheat to 300°F (150°C) and warm for about 5-10 minutes.
- Microwave – Heat on low power for 10-15 seconds until slightly softened.
- Stovetop – Not recommended, as they may lose their shape.
Frequently Asked Questions
Here are some common questions about making Frankenstein Oreo Balls:
Can I use different colors for coating?
Yes! Feel free to experiment with different colored melting wafers for various themes or occasions.
How do I get my balls to hold their shape?
Chill your mixture thoroughly before shaping the balls. This helps them maintain their form during coating.
Can I customize the decorations?
Absolutely! Use various candies or sprinkles as decorations to give each ball a unique personality.
What is the best way to serve these treats?
Display them on a festive platter or arrange them individually in cupcake liners for easy serving at parties.
How do I store leftover Frankenstein Oreo Balls?
Store them in an airtight container in the refrigerator for up to five days or freeze them for longer storage.
Final Thoughts
Frankenstein Oreo Balls are not only visually appealing but also deliciously delightful. Their versatility makes them perfect for Halloween celebrations or any fun gathering. Customize your decorations and enjoy creating these spooky treats!
Frankenstein Oreo Balls
Frankenstein Oreo Balls are an irresistibly fun and festive treat that will bring a smile to everyone at your Halloween celebration or spooky gathering. These no-bake delights blend the classic flavors of Oreo cookies with creamy cheese, coated in vibrant green candy melts to resemble the iconic monster. Topped with playful candy eyes and crunchy pretzel sticks, these treats are not only visually appealing but also a rich indulgence that is easy to make. Perfect for kids and adults alike, you can unleash your creativity by customizing the decorations and serving them up on a colorful platter. These delightful bites are sure to become the highlight of any dessert table!
- Prep Time: 30 minutes
- Cook Time: 0 minutes
- Total Time: 30 minutes
- Yield: Approximately 24 servings 1x
- Category: Dessert
- Method: No-bake
- Cuisine: American
Ingredients
- 36 crushed Oreos
- 8 oz softened cream cheese
- 1 teaspoon vanilla extract
- 2 cups light green melting wafers
- ½ cup dark chocolate melting wafers
- Pretzel sticks
- Candy eyes
Instructions
- In a mixing bowl, combine crushed Oreos, cream cheese, and vanilla extract. Mix until well combined.
- Roll into smooth balls (about 2 tablespoons each) and place on a cookie sheet lined with parchment paper.
- Chill in the refrigerator for 2 hours to firm up.
- Melt green candy wafers in a microwave-safe bowl. Dip each ball until fully coated.
- Decorate with black sprinkles for hair, press on candy eyes, and insert pretzel stick pieces for added character.
- Pipe chocolate details for facial expressions before chilling again for 30 minutes.
Nutrition
- Serving Size: 1 cake pop (45g)
- Calories: 190
- Sugar: 14g
- Sodium: 90mg
- Fat: 11g
- Saturated Fat: 5g
- Unsaturated Fat: 4g
- Trans Fat: 0g
- Carbohydrates: 19g
- Fiber: 1g
- Protein: 2g
- Cholesterol: 15mg