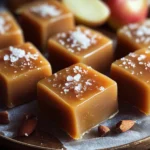
Apple Cider Caramels
Homemade Apple Cider Caramels are a delightful treat that captures the essence of autumn. With their soft and buttery texture, these caramels are perfect for gifting or enjoying during cozy nights in. The warm spices and rich apple flavor make them a unique addition to any dessert table or holiday celebration. You’ll love how easy they are to make, and they’re sure to impress family and friends alike.
Why You’ll Love This Recipe
- Delicious Flavor: The combination of apple cider and warm spices creates an irresistible taste that embodies fall.
- Perfect for Gifting: These caramels make thoughtful homemade gifts, wrapped beautifully in wax paper.
- Easy to Make: With simple ingredients and straightforward steps, anyone can create these delightful treats.
- Versatile Treat: Enjoy them on their own, dip them in chocolate, or use them as a topping for desserts.
- Customizable: Feel free to experiment with additional spices or flavors to suit your preferences.
Tools and Preparation
To make your homemade Apple Cider Caramels, you’ll need some essential tools. Having the right equipment will ensure your caramel-making process goes smoothly.
Essential Tools and Equipment
- Heavy-bottomed saucepan
- Candy thermometer
- Whisk
- 8×8-inch baking pan
- Parchment paper
Importance of Each Tool
- Heavy-bottomed saucepan: This tool prevents uneven cooking by distributing heat evenly, essential for achieving the perfect caramel consistency.
- Candy thermometer: Ensures accuracy in temperature measurement, which is crucial for reaching the ideal cooking stage for caramels.
- Whisk: Helps blend ingredients thoroughly and ensures a smooth mixture without lumps.

Ingredients
Homemade Apple Cider Caramels require a few simple ingredients that highlight their rich flavor profile.
For the Caramel Base
- 2 cups apple cider (real, unfiltered)
- 1 tsp ground cinnamon
- ¼ tsp ground nutmeg
- Pinch of ground cloves
For the Cream Mixture
- 1 cup heavy cream
For Sweetness and Texture
- 1½ cups granulated sugar
- ½ cup light corn syrup
- ½ cup (1 stick) unsalted butter, cubed
- ½ tsp sea salt
For Flavor Enhancement
- 1 tsp vanilla extract
Optional Toppings
- Chocolate for dipping
- Additional sea salt for topping
How to Make Apple Cider Caramels
Step 1: Prepare the Apple Cider Reduction
- In a medium saucepan, bring apple cider to a boil over medium-high heat.
- Reduce heat to a simmer for 20–30 minutes until about ½ cup remains.
- Stir in spices (cinnamon, nutmeg, cloves) and set aside.
Step 2: Prepare the Baking Pan
- Line an 8×8-inch baking pan with parchment paper, leaving overhang “handles” for easy removal.
- Lightly butter the parchment paper to prevent sticking.
Step 3: Make the Cream Mixture
- Whisk heavy cream into the reduced apple cider mixture.
- Set this mixture aside while you prepare the sugar mixture.
Step 4: Cook the Sugar Mixture
- In a heavy-bottomed saucepan, combine granulated sugar, corn syrup, and cubed butter.
- Cook over medium heat, stirring gently until sugar dissolves and butter melts (about 5–7 minutes).
Step 5: Combine Mixtures
- Slowly add the spiced cream mixture to the sugar mixture—expect bubbling.
- Stir gently to combine both mixtures thoroughly.
Step 6: Cook to Firm-Ball Stage
- Attach a candy thermometer to your saucepan.
- Continue cooking until it reaches 248°F (firm-ball stage), stirring occasionally (around 15–20 minutes).
Step 7: Final Steps
- Remove from heat and stir in vanilla extract and sea salt.
- Pour evenly into your prepared pan and let cool at room temperature for about 2–3 hours or overnight.
Step 8: Cut and Store
- Lift caramel slab using parchment “handles”.
- Cut into squares; if sticky, grease knife lightly before cutting.
- Wrap individual pieces in wax paper for storage or gifting.
Enjoy your homemade Apple Cider Caramels as a sweet treat or share them with loved ones!
How to Serve Apple Cider Caramels
Homemade Apple Cider Caramels are delightful treats that can be enjoyed in various ways. Whether you’re hosting a cozy gathering or looking for a sweet gift, serving these caramels creatively can elevate the experience.
Gift Packaging
- Use colorful wax paper to wrap individual caramels, adding a personal touch with handwritten tags.
- Consider placing several wrapped caramels in a decorative box or jar for an impressive gift.
Dessert Platter
- Arrange the caramels on a stylish dessert platter alongside seasonal fruits and nuts for a beautiful presentation.
- Pair with some dark chocolate for dipping to enhance the flavor profile.
With Coffee or Tea
- Serve warm caramels alongside steaming cups of coffee or herbal tea, creating a comforting treat for chilly evenings.
- Guests will appreciate the blend of rich flavors from both drinks and candies.
At Parties
- Place bowls of Apple Cider Caramels on tables during gatherings as easy-to-grab snacks.
- This simple addition can bring a festive touch to your event.
How to Perfect Apple Cider Caramels
To achieve the best homemade Apple Cider Caramels, consider these essential tips. They’ll help ensure your caramels turn out perfectly every time.
- Use real apple cider: Choose unfiltered apple cider to capture authentic fall flavors in your caramels.
- Monitor the temperature: Use a candy thermometer to precisely reach 248°F, which is crucial for achieving that firm yet chewy texture.
- Stir gently: When cooking the sugar mixture, stir gently to prevent crystallization, ensuring smooth caramels.
- Let them cool properly: Allow the caramels to cool completely at room temperature before cutting; this helps maintain their shape and texture.
- Store correctly: Wrap each caramel individually in wax paper to keep them fresh and prevent sticking.
Best Side Dishes for Apple Cider Caramels
Apple Cider Caramels pair wonderfully with various side dishes that complement their rich sweetness. Here are some great options:
- Cheese Board
A selection of cheeses like sharp cheddar or creamy brie enhances the sweet and savory contrast beautifully. - Spiced Nuts
Roasted nuts sprinkled with cinnamon and sugar provide a crunchy texture that balances the softness of the caramels. - Fresh Fruit Salad
A mix of apples, pears, and berries adds freshness and offsets the rich flavors of the caramels nicely. - Pumpkin Bread
The warm spices in pumpkin bread pair excellently with the autumn flavors of Apple Cider Caramels. - Caramel Popcorn
Sweet and salty popcorn drizzled with caramel sauce makes for a fun snack that ties into the caramel theme. - Ginger Cookies
The spiciness of ginger cookies complements the sweet notes of Apple Cider Caramels perfectly for a delightful dessert combo.
Common Mistakes to Avoid
Making Apple Cider Caramels can be a delightful experience, but avoiding common mistakes will ensure your caramels turn out perfectly every time.
- Not reducing the cider enough: If the apple cider is not boiled down sufficiently, your caramels may end up too runny. Aim for about ½ cup of concentrated cider for the best flavor and consistency.
- Skipping the candy thermometer: Relying on visual cues instead of a thermometer can lead to improperly cooked caramels. Always use a candy thermometer to ensure your mixture reaches 248°F for the firm-ball stage.
- Not preparing the pan properly: Failing to line your baking pan with parchment paper can cause your caramels to stick. Make sure to use parchment with overhangs for easy removal.
- Ignoring the sea salt addition: Sea salt enhances the flavor of your caramels. Don’t skip this step—add it right before pouring into the pan for an extra depth of taste.
- Cutting too soon: Cutting into the caramels while they are still warm can lead to a sticky mess. Allow them to cool completely at room temperature before cutting into squares.

Storage & Reheating Instructions
Refrigerator Storage
-
- Keep in an airtight container*: Store your Apple Cider Caramels in an airtight container to maintain freshness.
-
- Duration*: They will last up to two weeks in the refrigerator.
Freezing Apple Cider Caramels
-
- Wrap individually*: For longer storage, wrap each caramel in wax paper before placing them in a freezer bag.
-
- Duration*: They can be frozen for up to three months.
Reheating Apple Cider Caramels
- Oven: Preheat to 250°F and place caramels on a baking sheet for gentle reheating.
- Microwave: Heat in short increments (5-10 seconds) until just soft; watch closely to avoid melting completely.
- Stovetop: Use a double boiler on low heat, stirring gently until warmed through.
Frequently Asked Questions
Here are some common questions regarding Apple Cider Caramels that may help you.
How do I make Apple Cider Caramels softer?
If you prefer softer caramels, reduce the cooking time slightly or add a bit more heavy cream during preparation.
Can I use apple juice instead of apple cider?
Yes, you can substitute apple juice, but it may alter the flavor profile, resulting in less depth compared to using real apple cider.
What is the best way to cut Apple Cider Caramels?
Use a greased knife or kitchen scissors after they have cooled completely. This helps prevent sticking and ensures clean cuts.
How long do homemade Apple Cider Caramels last?
When stored properly, homemade Apple Cider Caramels can last up to two weeks in the refrigerator or three months if frozen.
Can I add other flavors to my Apple Cider Caramels?
Absolutely! Feel free to experiment with spices like ginger or cardamom or even add nuts for extra texture and flavor.
Final Thoughts
These homemade Apple Cider Caramels are not only delicious but also versatile. Perfect as gifts or treats for cozy nights at home, you can customize them by adding different spices or toppings. Try making this recipe today and enjoy the rich flavors of autumn!
Apple Cider Caramels
Homemade Apple Cider Caramels are a delightful way to celebrate the flavors of autumn. With their soft, buttery texture and warm spice notes, these chewy confections make perfect gifts or a cozy treat for yourself. Infused with rich apple cider and complemented by cinnamon, nutmeg, and cloves, each bite captures the essence of fall. Whether enjoyed alone or as part of a dessert platter, these caramels are sure to impress.
- Prep Time: 30 minutes
- Cook Time: 20 minutes
- Total Time: 50 minutes
- Yield: Approximately 32 servings 1x
- Category: Dessert
- Method: Baking
- Cuisine: American
Ingredients
- 2 cups apple cider (real, unfiltered)
- 1 cup heavy cream
- 1½ cups granulated sugar
- ½ cup light corn syrup
- ½ cup unsalted butter (cubed)
- 1 tsp vanilla extract
- 1 tsp ground cinnamon
- ¼ tsp ground nutmeg
- pinch of ground cloves
- ½ tsp sea salt
Instructions
- In a medium saucepan, boil the apple cider until reduced to about ½ cup. Stir in spices and set aside.
- Line an 8×8-inch baking pan with parchment paper and lightly butter it.
- Whisk the reduced cider with heavy cream; set aside.
- In a heavy-bottomed saucepan, combine sugar, corn syrup, and cubed butter over medium heat until dissolved.
- Add the cream mixture slowly to the sugar mixture; stir gently.
- Cook until it reaches 248°F (firm-ball stage), stirring occasionally (around 15–20 minutes).
- Remove from heat; mix in vanilla extract and sea salt.
- Pour into prepared pan and cool completely before cutting into squares.
Nutrition
- Serving Size: 1 serving
- Calories: 60
- Sugar: 7g
- Sodium: 20mg
- Fat: 3g
- Saturated Fat: 2g
- Unsaturated Fat: 1g
- Trans Fat: 0g
- Carbohydrates: 9g
- Fiber: 0g
- Protein: <1g
- Cholesterol: 10mg